Currently it only shows your basic business info. Start adding relevant business details such as description, images and products or services to gain your customers attention by using Boost 360
android app
/
iOS App/ web portal.
{
"products": [
{
"_id": "668556664bffde21ec92eb2b",
"fptag": "SALBROENGINEERS",
"merchantname": null,
"customwidgets": null,
"externalsourceid": null,
"name": "R500 Roundness Tester",
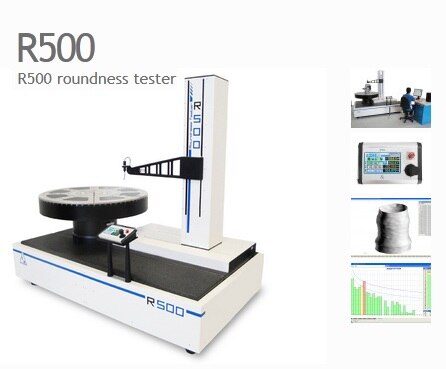
"description": "R500 roundness tester is located at the top of machines for the characterization of revolution surfaces in the world panorama for what concerns the maximum dimensions of the object that can be measured; born from the thirty year experience that SM has in this field, it has been designed to measure bulky and heavy pieces, maintaining high accuracies.\n\nR500 features 3 metrological axes, pneumostatically supported, for measurement and positioning, which ensure fluent movements without frictions and remarkable sturdiness of the entire system.\n\nThe flagship application of R500 is the characterization of bulky particulars in the energy sector (turbines, compressors, bearings) where all the essential characteristics for the final quality of the product must be determined.\n\nThe motorized plate allows the automatic centering of the piece, executed with a procedure inside the Circom software.\n\nCHARACTERISTICS:\nPneumostatic plate\nPlatform diameter: 650 mm\nExpansion diameter: 1200 mm\nMaximum measureable diameter: 1300 mm\nAxial bearing capacity: 1500 kg\nRadial run-out (at plate level): ≤0,1 μm\nSpeed: 0,25 – 3 rpm (measurement) 0 – 6 rpm (positioning)\nFriction: Pneumostatic due to manual rotation\nCentring range: ±5 mm with automatic cycle\nLevelling range: ± 1°\nResolution: 0,009° (40k pts/rev)\n\nPneumostatic R axis\nUseful traverse length: 650 mm\nLinearity: ≤ 0,5 μm su 500 mm\nSpeed: 0,2 – 10 mm/s\nResolution: 1 μm\nC axis (Column with recirculating ball guides)\nUseful traverse length: 900 mm\nMaximum height : 600 mm (from plate surface)\nLinearity error: ≤ 0,5 μm on 500 mm\nSpeed : 0,5 – 15 mm/s\nResolution 0,1 μm\nPick-up Measurement positioning: In three positions (internal, external, lateral)\nMeasurement strength : Internal/external 20 – 150 mN\nMeasurement range : ±1000 μm\nSupplied pick-ups : N° 3 two-directional with 8 mm ruby sphere",
"price": 1.0,
"discountamount": 0.0,
"currencycode": "INR",
"priority": 1000000,
"isfreeshipmentavailable": false,
"shipmentduration": 0,
"_keywords": [
"1 μ",
"6 rpm",
"3 rpm",
"15 mm",
"10 mm",
"±5 mm",
"150 mN",
"0,5 μm",
"600 mm",
"900 mm",
"C axis",
"1500 kg",
"1300 mm",
"1200 mm",
"±1000 μm",
"plate level",
"500 mm Speed",
"heavy pieces",
"final quality",
"energy sector",
"entire system",
"plate surface",
"Radial run-out",
"world panorama",
"Maximum height",
"Centring range",
"three positions",
"Linearity error",
"manual rotation",
"Circom software",
"high accuracies",
"motorized plate",
"650 mm Linearity",
"fluent movements",
"8 mm ruby sphere",
"bulky particulars",
"Measurement range",
"maximum dimensions",
"Expansion diameter",
"3 metrological axes",
"revolution surfaces",
"automatic centering",
"Pneumostatic R axis",
"Internal/external 20",
"Measurement strength",
"flagship application",
"remarkable sturdiness",
"R500 Roundness Tester",
"Useful traverse length",
"Axial bearing capacity",
"thirty year experience",
"essential characteristics",
"recirculating ball guides",
"Maximum measureable diameter",
"Pick-up Measurement positioning",
"automatic cycle Levelling range",
"Pneumostatic plate Platform diameter"
],
"isarchived": false,
"isavailable": true,
"applicationid": null,
"productindex": 47,
"imageuri": "https://productimages.withfloats.com/actual/63e10f3245c48e0001eb3324.jpg",
"tileimageuri": "https://productimages.withfloats.com/actual/63e10f3245c48e0001eb3324.jpg",
"images": null,
"totalqueries": 0,
"gpid": null,
"groupproductid": null,
"createdon": "2024-07-03T13:47:18.891Z",
"updatedon": "2024-07-03T13:47:18.891Z",
"buyonlinelink": null,
"producturl": "http://WWW.SALBROENGINEERS.COM/products/r500-roundness-tester/47",
"availableunits": -1.0,
"iscodavailable": false,
"isprepaidonlineavailable": true,
"maxcodorders": 0,
"maxprepaidonlineorders": 0,
"uniquepaymenturl": null,
"brandname": "SM Metrology Systems",
"category": "Roundness Tester",
"tags": [
"",
"",
"roundness tester",
"",
"large Size Bearings measurement",
"",
"Form Measurement",
"",
"Roundness Measuring",
"",
"Cylindricity",
"",
"turbines measurement",
"",
"compressors measurement",
""
],
"variants": false,
"keyspecification": null,
"otherspecifications": null,
"pickupaddressreferenceid": "",
"paymenttype": "UniquePaymentUrl",
"producttype": "products",
"hsncode": "",
"gstslab": 0.001,
"isnotforsale": false
},
{
"_id": "6210c87dbdd2cd000107fe5a",
"fptag": "SALBROENGINEERS",
"merchantname": null,
"customwidgets": null,
"externalsourceid": null,
"name": "R500 Roundness Tester",
"description": "R500 roundness tester is located at the top of machines for the characterization of revolution surfaces in the world panorama for what concerns the maximum dimensions of the object that can be measured; born from the thirty year experience that SM has in this field, it has been designed to measure bulky and heavy pieces, maintaining high accuracies.\n\nR500 features 3 metrological axes, pneumostatically supported, for measurement and positioning, which ensure fluent movements without frictions and remarkable sturdiness of the entire system.\n\nThe flagship application of R500 is the characterization of bulky particulars in the energy sector (turbines, compressors, bearings) where all the essential characteristics for the final quality of the product must be determined.\n\nThe motorized plate allows the automatic centering of the piece, executed with a procedure inside the Circom software.\n\nCHARACTERISTICS:\nPneumostatic plate\nPlatform diameter: 650 mm\nExpansion diameter: 1200 mm\nMaximum measureable diameter: 1300 mm\nAxial bearing capacity: 1500 kg\nRadial run-out (at plate level): ≤0,1 μm\nSpeed: 0,25 – 3 rpm (measurement) 0 – 6 rpm (positioning)\nFriction: Pneumostatic due to manual rotation\nCentring range: ±5 mm with automatic cycle\nLevelling range: ± 1°\nResolution: 0,009° (40k pts/rev)\n\nPneumostatic R axis\nUseful traverse length: 650 mm\nLinearity: ≤ 0,5 μm su 500 mm\nSpeed: 0,2 – 10 mm/s\nResolution: 1 μm\nC axis (Column with recirculating ball guides)\nUseful traverse length: 900 mm\nMaximum height : 600 mm (from plate surface)\nLinearity error: ≤ 0,5 μm on 500 mm\nSpeed : 0,5 – 15 mm/s\nResolution 0,1 μm\nPick-up Measurement positioning: In three positions (internal, external, lateral)\nMeasurement strength : Internal/external 20 – 150 mN\nMeasurement range : ±1000 μm\nSupplied pick-ups : N° 3 two-directional with 8 mm ruby sphere",
"price": 1.0,
"discountamount": 0.0,
"currencycode": "INR",
"priority": 1000000,
"isfreeshipmentavailable": false,
"shipmentduration": 7,
"_keywords": [
"top",
"field",
"object",
"turbines",
"machines",
"bearings",
"procedure",
"frictions",
"compressors",
"positioning",
"measurement",
"heavy pieces",
"energy sector",
"final quality",
"entire system",
"world panorama",
"motorized plate",
"Circom software",
"high accuracies",
"R500 SM Product",
"characterization",
"fluent movements",
"bulky particulars",
"maximum dimensions",
"automatic centering",
"3 metrological axes",
"revolution surfaces",
"flagship application",
"remarkable sturdiness",
"R500 Roundness Tester",
"thirty year experience",
"essential characteristics"
],
"isarchived": false,
"isavailable": true,
"applicationid": null,
"productindex": 30,
"imageuri": "https://productimages.withfloats.com/actual/63c7c0971a09760001dba52c.jpg",
"tileimageuri": "https://productimages.withfloats.com/actual/63c7c0971a09760001dba52c.jpg",
"images": null,
"totalqueries": 0,
"gpid": null,
"groupproductid": null,
"createdon": "2022-02-19T10:37:49.614Z",
"updatedon": "2023-02-06T14:31:13Z",
"buyonlinelink": null,
"producturl": "http://WWW.SALBROENGINEERS.COM/products/r500-roundness-tester/30",
"availableunits": -1.0,
"iscodavailable": false,
"isprepaidonlineavailable": false,
"maxcodorders": 0,
"maxprepaidonlineorders": 0,
"uniquepaymenturl": null,
"brandname": "SM Metrology Systems",
"category": "Roundness Tester",
"tags": [
"roundness tester",
"large Size Bearings measurement",
"Form Measurement",
"Roundness Measuring",
"Cylindricity",
"turbines measurement",
"compressors measurement"
],
"variants": false,
"keyspecification": null,
"otherspecifications": null,
"pickupaddressreferenceid": "",
"paymenttype": "AssuredPurchase",
"producttype": "products",
"hsncode": null,
"gstslab": 0.001,
"isnotforsale": false
},
{
"_id": "6210c557584a740001165816",
"fptag": "SALBROENGINEERS",
"merchantname": null,
"customwidgets": null,
"externalsourceid": null,
"name": "R300 Laboratary Roundness Tester",
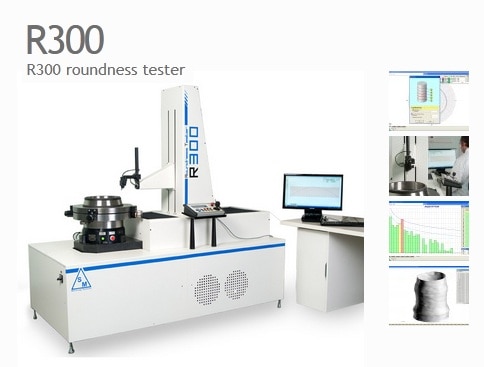
"description": "R300 roundness tester is one of the best devices worldwide for the characterization of surfaces, born from thirty years of experience boasted by SM in this field, it was specifically designed to measure bulky and heavy pieces, with utmost accuracy.\nR300 features 3, pneumostatically supported, metrological measurement and positioning axes that ensure fluent movements without frictions and remarkable sturdiness of the entire system.\nThe main application of R300 consists in the characterization of large size bearings, where all those essential characteristics for the final quality of the product must be determined, among which roundness and race angles, which are measured by following the piece's profile with more axes working at the same time, thus generating a considerable number of measurements.\n\nCHARACTERISTICS:\n\nPneumostatic plate\nPlatform diameter: \t450 mm\nExpansion diameter: 800 mm\nMaximum measureable diameter: 1000 mm\nAxial bearing capacity: 1200 kg\nRadial run-out (at plate level): ≤0,1 μm\nSpeed: \t0,5 – 3 rpm (measurement) 0 – 6 rpm (positioning)\nFriction: Pneumostatic due to manual rotation\nCentring range: ±5 mm\nLevelling range: \t± 1°\nResolution: \t0,1°\n\nPneumostatic R axis\nUseful traverse length: 500 mm\nLinearity: ≤ 0,5 μm su 500 mm\nSpeed: 0,2 – 10 mm/s\nResolution: 0,1 μm\n\nC axis (pneumostatic column)\nUseful traverse length: 500 mm\nMaximum height : 600 mm (from plate surface)\nLinearity error: ≤ 0,5 μm on 500 mm\nSpeed : 0,5 – 15 mm/s\nResolution: 0,1 μm\n\nPick-up\nMeasurement positioning: In three positions (horizontal, vertical, lateral)\nMeasurement strenght : Internal/esternal 20 – 150 mN\nMeasurement range : ±1000 μm\nSupplied pick-ups : N° 3 two-directional of lenght 80 - 150 – 240 mm\n\nSalbro Engineers represents SM Metrology Systems for their surface metrology products such as \nRoundness, Roughness, Contour / Profile measuring machines and accessories.\n",
"price": 1.0,
"discountamount": 0.0,
"currencycode": "INR",
"priority": 1000000,
"isfreeshipmentavailable": false,
"shipmentduration": 7,
"_keywords": [
"field",
"bulky",
"profile",
"surfaces",
"frictions",
"same time",
"experience",
"race angles",
"measurements",
"heavy pieces",
"thirty years",
"best devices",
"entire system",
"R300 features",
"final quality",
"R300 SM Product",
"utmost accuracy",
"characterization",
"positioning axes",
"main application",
"fluent movements",
"large size bearings",
"considerable number",
"remarkable sturdiness",
"R300 roundness tester",
"metrological measurement",
"essential characteristics",
"R300 Laboratary Roundness Tester"
],
"isarchived": false,
"isavailable": true,
"applicationid": null,
"productindex": 29,
"imageuri": "https://productimages.withfloats.com/actual/63c7c28845a22b0001e71c35.jpg",
"tileimageuri": "https://productimages.withfloats.com/actual/63c7c28845a22b0001e71c35.jpg",
"images": null,
"totalqueries": 0,
"gpid": null,
"groupproductid": null,
"createdon": "2022-02-19T10:24:23.638Z",
"updatedon": "2023-02-06T14:33:23Z",
"buyonlinelink": null,
"producturl": "http://WWW.SALBROENGINEERS.COM//r300-laboratary-roundness-tester/29",
"availableunits": -1.0,
"iscodavailable": false,
"isprepaidonlineavailable": false,
"maxcodorders": 0,
"maxprepaidonlineorders": 0,
"uniquepaymenturl": null,
"brandname": "SM Metrology Systems",
"category": "Roundness Tester",
"tags": [
"roundness",
"cylindricity",
"large Size Bearings",
"Laboratary Roundness Tester",
"large size bearings"
],
"variants": false,
"keyspecification": null,
"otherspecifications": null,
"pickupaddressreferenceid": "",
"paymenttype": "AssuredPurchase",
"producttype": "products",
"hsncode": null,
"gstslab": 0.001,
"isnotforsale": false
},
{
"_id": "668556c9d622e123ecf5d37b",
"fptag": "SALBROENGINEERS",
"merchantname": null,
"customwidgets": null,
"externalsourceid": null,
"name": "Soccer Trainer Machine",
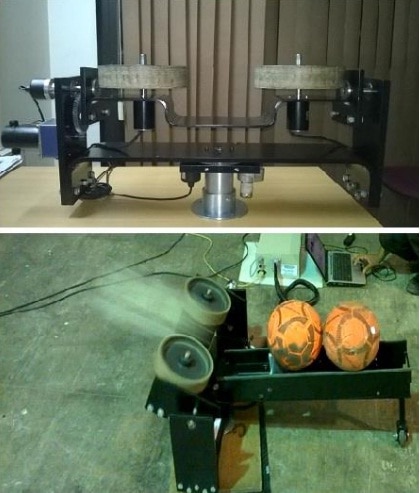
"description": "The automated Soccer Trainer machine is a product entirely developed In-house comprising of mechanical structure, Electronics, Embedded and the User Interface software system all put together to achieve a dynamic football training machine.\n\nProduct Features\no Auto Calirate @ the click of a button\no Tilt/Vertical movement : The angle (degs) range for Tilt movement is from -10 degs to 90 degs.\no Pan / Horizontal movement : The angle (degs) range for Pan Movement is from -45 degs to 45 degs.\no Ball Shooters / Rollers : The right and left roller motors run at 540 rpm to 4200 rpm\no Robust Design\no Well selected, motors and encoders (high PPR).\no Swing,Spin the ball based on appropriate settings]\no Encoder with hogh PPR for position feedback.\no Heavy motors for Ball shoot rollers.\n\nEmbedded n Electronic features\no Well designed electronic boards\no Boards are CNC manufactured.\no High end micro controller to control the machine.\n\nPC User Interface Software (Win Desktop).\no Interface between micro conroller n PC software is via Serial port\no Lan port interfacing can also be incorporated (optional)\no Three levels of trainng settings ( Baic,Advanced,Intermediate)\no Create libraries of settings for Pan,Tilt,Right n Left Roller speeds\no Once the settings are saved, Input the no of balls you need to feed for training, the system handles it all unmanned.Feature is Auto Ball Feed Mode\no Manual movements of all motors.\no Stop all motors or individual motors.\n\nVideo's : https://www.youtube.com/watch?v=1k_rQgFsp7I\n\n https://www.youtube.com/watch?v=I3dVJiWE_RQ",
"price": 1.0,
"discountamount": 0.0,
"currencycode": "INR",
"priority": 1000000,
"isfreeshipmentavailable": false,
"shipmentduration": 0,
"_keywords": [
"540 rpm",
"45 degs",
"90 degs",
"4200 rpm",
"hogh PPR",
"high PPR",
"degs) range",
"Win Desktop",
"Serial port",
"PC software",
"Pan Movement",
"Heavy motors",
"Three levels",
"Tilt movement",
"Robust Design",
"Ball Shooters",
"Auto Calirate",
"trainng settings",
"Manual movements",
"Product Features",
"individual motors",
"position feedback",
"electronic boards",
"micro conroller n",
"Ball shoot rollers",
"left roller motors",
"Left Roller speeds",
"Horizontal movement",
"Auto Ball Feed Mode",
"appropriate settings",
"mechanical structure",
"Lan port interfacing",
"Tilt/Vertical movement",
"High end micro controller",
"PC User Interface Software",
"User Interface software system",
"Embedded n Electronic features",
"automated Soccer Trainer machine",
"dynamic football training machine"
],
"isarchived": false,
"isavailable": true,
"applicationid": null,
"productindex": 50,
"imageuri": "https://productimages.withfloats.com/actual/5f465175d3586e0001b5a604.jpg",
"tileimageuri": "https://productimages.withfloats.com/actual/5f465175d3586e0001b5a604.jpg",
"images": null,
"totalqueries": 0,
"gpid": null,
"groupproductid": null,
"createdon": "2024-07-03T13:48:57.622Z",
"updatedon": "2024-07-03T13:54:59Z",
"buyonlinelink": null,
"producturl": "http://WWW.SALBROENGINEERS.COM/products/soccer-trainer-machine/50",
"availableunits": -1.0,
"iscodavailable": false,
"isprepaidonlineavailable": true,
"maxcodorders": 0,
"maxprepaidonlineorders": 0,
"uniquepaymenturl": null,
"brandname": "Salbro Engineers",
"category": "Soccer Trainer Machine",
"tags": [
"Soccer",
"Soccer Trainer",
"unmanned system",
"football practi",
"Goal Keeper Trainer",
"football"
],
"variants": false,
"keyspecification": null,
"otherspecifications": null,
"pickupaddressreferenceid": "",
"paymenttype": "AssuredPurchase",
"producttype": "products",
"hsncode": "",
"gstslab": 0.001,
"isnotforsale": false
},
{
"_id": "6446742e82c0230001a5d489",
"fptag": "SALBROENGINEERS",
"merchantname": null,
"customwidgets": null,
"externalsourceid": null,
"name": "TALYROND 252 Roundness Tester Retrofit",
"description": "Note*-Machines displayed are Products/property of respective Manufactures. Machine Pictures used are to state compatibility of our Retrofit Package only.\n\nSeRound the Software Retrofit is user friendly, powerful and is performance driven. It is developed in-House at Salbro Engineers and has under gone years of field tests. It provides a through interactive user interface between the user and the Instrument. All Integrated to make one precise instrument to detect and assess the following results in Roundness, Concentricity, Eccentricity, Flatness (rotating 3D profile display), Cylindricity, Straightness, Parallelism, Squareness, Coaxiality and Radial Run-out, Axial Out, Harmonics.\n\nSeRound is proficient in Data acquisition, profile filtering, and assessment of the roundness parameters and graphical presentation of the results. It also performs instrument control. SeRound’s Setup and Measure window assists the user in accurately centering and leveling the job thus saving on time and improving productivity. The measuring process is initiated by the user by a mere click of a button and displaces measure completed’ massage at the end of measuring sequence. SeRound offers options to choose the method of calculation and assessment. Roundness and Flatness assessments are carried out on 4 internationally recognized reference circles (LSC, MIC, MCC and MZC). MZ Cylinder for Cylindricity analysis, LSL and MZ Lines for Straightness analysis., Operator is able to omit unwanted data and carry out analysis with remaining data. Measured data can be saved, retrieved and re-analyzed to any of the available conditions as desired by the user.\n\nA. MESUREMENT CAPACITY\n\n1. Maximum diameter : 350 mm (13.8 in) optionally(also see Para 9) \nextendable to 500 mm (19.7 in)2. Maximum Weight : 20 kg (44.1 lb)3. Maximum Height of assessable Surface : 300mm (11.8 in)4. Worktable Moment Loading : 120 kgmm (10.4 lbin)5. Maximum Eccentricity : 25mm (0.98in) along the load line\n\nB. WORKTABLE AND SPINDLE\n1. Worktable Diameter :190mm (7.5 in)2. Speed of Rotation : 6 rpm nominal, clockwise3. Range of Centering Nominal : ±1mm (±0.04in)4. Range of Leveling Nominal : ±4.1 mrad (±14 arc minutes)5. Height of neutral plane above Worktable : 20mm (0.79in)6. Roundness Limit of Error : Concentric Load 20kg (44.1 lb)(Departure from the least within 0.06 µm 0.0003µm/mmSquares circle at 6 rpm with height above worktable 0-50 u.p.r filter) (1.5 µin 0.3 µin/in)*7. Axial Error : 0.15µm (3.9 µin) maximum axial movement of worktable during one revolution.\n*These departures may be inwards and outwards\n\nC. VERTICAL STRAIGHTNESS UNIT\n1. Measurement Length : 300 mm (11.8in),2. Accuracy of stop Measurement : 0.5mm (0.02in)3. Speed of Traverse (for set-up) : (1) Joystick slow speed0-3mm/s (0-0.12 in/s) for approx 70% of joystick travel. (2) Computer controlled <3 mm/sec variable.4. Straightness limit of Error : In the measuring plane: (Minimum zone straightness at 1µm over 300 mm (40µin 1mm/sec (0.04 in/sec) with over 11.8in) 8.0mm (0.3in) cut off low pass filter5. Positional Control Uncertainty : ±100µm (±0.004in) for one single move.6. Internal Capacity : 150mm (5.9in) For Straightness Limiting conditions, Maximum length of continuous Minimum diameter clearance Internal surface that can be assessed 115mm (4.5in) depth in bores larger thanØ25mm (Ø1in)7. For Roundness assessment Internal bore penetration : 150mm (5.9in), 115mm depth in bore of Ø25mm\n***Internal penetration for other than ‘limiting condition’ depends on component geometry.\n\nD. RADIAL STRAIGHTNESS UNIT1. Traverse Length : 200mm (7.9in) This may be set for up to 50mm (1.97in) of travel past the spindle axis. Standard setting is 25mm past the spindle axis.2. Speed of Traverse : up to 2mm/sec3. Positional control uncertainty : ±50µm (±0.002in) for one single move.This is for both relative and absolute movements.\n\nE. GAUGE1. Standard Stylus Arm Length : 75mm (2.95”) effective length2. Range of Gauge movement with80mm Stylus Arm : 1.2mm (0.079in) Nominal F. ELECTRICAL SUPPLY\n\nMain Instrument Overall Weight : 279kg (615lbs)\nOverall Length : 760mm (29.9in)\nOverall Width : 760mm (29.9in)\nOverall Height : 1513mm (59.6in)\n",
"price": 1.0,
"discountamount": 0.0,
"currencycode": "INR",
"priority": 1000000,
"isfreeshipmentavailable": false,
"shipmentduration": 7,
"_keywords": [
"LSL",
"MCC",
"MIC",
"LSC",
"job",
"end",
"MZC",
"time",
"Note",
"Setup",
"years",
"House",
"button",
"method",
"options",
"SeRound",
"Machines",
"Products",
"property",
"MZ Lines",
"Harmonics",
"Squareness",
"Coaxiality",
"mere click",
"Radial Run",
"MZ Cylinder",
"calculation",
"field tests",
"Parallelism",
"performance",
"productivity",
"Eccentricity",
"compatibility",
"Concentricity",
"Measured data",
"unwanted data",
"remaining data",
"Measure window",
"Retrofit Package",
"Data acquisition",
"Machine Pictures",
"Salbro Engineers",
"following results",
"measuring process",
"profile filtering",
"Software Retrofit",
"measuring sequence",
"instrument control",
"Flatness assessments",
"roundness parameters",
"available conditions",
"Cylindricity analysis",
"Straightness analysis",
"graphical presentation",
"one precise instrument",
"respective Manufactures",
"interactive user interface",
"rotating 3D profile display",
"TALYROND 252 Roundness Tester Retrofit",
"4 internationally recognized reference circles"
],
"isarchived": false,
"isavailable": true,
"applicationid": null,
"productindex": 44,
"imageuri": "https://productimages.withfloats.com/actual/644674336e06d800016fc260.jpg",
"tileimageuri": "https://productimages.withfloats.com/actual/644674336e06d800016fc260.jpg",
"images": null,
"totalqueries": 0,
"gpid": null,
"groupproductid": null,
"createdon": "2023-04-24T12:21:02.447Z",
"updatedon": "2024-07-03T13:28:44Z",
"buyonlinelink": null,
"producturl": "http://WWW.SALBROENGINEERS.COM/products/talyrond-252-roundness-tester-retrofit/44",
"availableunits": -1.0,
"iscodavailable": false,
"isprepaidonlineavailable": false,
"maxcodorders": 0,
"maxprepaidonlineorders": 0,
"uniquepaymenturl": null,
"brandname": "",
"category": "Roundness Tester Retrofit",
"tags": [
"Roundness Teste Retrofit Package",
"Laboratary Roundness Tester",
"Upgraded Software",
"roundness",
"Straightness",
"Cylindricity",
"Parallelism",
"Flatness",
"Relative Eccentricity",
"eccentricity",
"squareness",
"Velocity Analysis",
"Harmonics",
"Axial Runout",
"Radial Runout"
],
"variants": false,
"keyspecification": null,
"otherspecifications": null,
"pickupaddressreferenceid": "",
"paymenttype": "AssuredPurchase",
"producttype": "products",
"hsncode": null,
"gstslab": 0.001,
"isnotforsale": false
},
{
"_id": "5b6b383595c4160537731fb6",
"fptag": "SALBROENGINEERS",
"merchantname": null,
"customwidgets": null,
"externalsourceid": null,
"name": "Soccer Trainer Machine",
"description": "The automated Soccer Trainer machine is a product entirely developed In-house comprising of mechanical structure, Electronics, Embedded and the User Interface software system all put together to achieve a dynamic football training machine.\n\nProduct Features\no Auto Calirate @ the click of a button\no Tilt/Vertical movement : The angle (degs) range for Tilt movement is from -10 degs to 90 degs.\no Pan / Horizontal movement : The angle (degs) range for Pan Movement is from -45 degs to 45 degs.\no Ball Shooters / Rollers : The right and left roller motors run at 540 rpm to 4200 rpm\no Robust Design\no Well selected, motors and encoders (high PPR).\no Swing,Spin the ball based on appropriate settings]\no Encoder with hogh PPR for position feedback.\no Heavy motors for Ball shoot rollers.\n\nEmbedded n Electronic features\no Well designed electronic boards\no Boards are CNC manufactured.\no High end micro controller to control the machine.\n\nPC User Interface Software (Win Desktop).\no Interface between micro conroller n PC software is via Serial port\no Lan port interfacing can also be incorporated (optional)\no Three levels of trainng settings ( Baic,Advanced,Intermediate)\no Create libraries of settings for Pan,Tilt,Right n Left Roller speeds\no Once the settings are saved, Input the no of balls you need to feed for training, the system handles it all unmanned.Feature is Auto Ball Feed Mode\no Manual movements of all motors.\no Stop all motors or individual motors.\n\nVideo's : https://www.youtube.com/watch?v=1k_rQgFsp7I\n\n https://www.youtube.com/watch?v=I3dVJiWE_RQ",
"price": 1.0,
"discountamount": 0.0,
"currencycode": "INR",
"priority": 1000000,
"isfreeshipmentavailable": false,
"shipmentduration": 7,
"_keywords": [
"Heavy motors",
"roller motors",
"Tilt movement",
"n Left Roller",
"Auto Ball Feed",
"Manual movements",
"Create libraries",
"Horizontal movement",
"Lan port interfacing",
"Soccer Trainer machine",
"High end micro controller",
"dynamic football training",
"micro conroller n PC software",
"User Interface software system"
],
"isarchived": false,
"isavailable": true,
"applicationid": null,
"productindex": 5,
"imageuri": "https://productimages.withfloats.com/actual/59e9d648531150051c021eb5.jpg",
"tileimageuri": "https://productimages.withfloats.com/actual/59e9d648531150051c021eb5.jpg",
"images": null,
"totalqueries": 0,
"gpid": null,
"groupproductid": null,
"createdon": "2017-10-20T10:56:09.127Z",
"updatedon": "2024-07-03T14:08:33Z",
"buyonlinelink": null,
"producturl": "http://WWW.SALBROENGINEERS.COM/products/soccer-trainer-machine/5",
"availableunits": -1.0,
"iscodavailable": false,
"isprepaidonlineavailable": false,
"maxcodorders": 0,
"maxprepaidonlineorders": 0,
"uniquepaymenturl": null,
"brandname": "Salbro Engineers",
"category": "Soccer Trainer Machine",
"tags": [
"Soccer",
"Trainer",
"Goal Keeper Trainer",
"Football Trainer machine",
"football",
"Train"
],
"variants": false,
"keyspecification": null,
"otherspecifications": null,
"pickupaddressreferenceid": "",
"paymenttype": "AssuredPurchase",
"producttype": "products",
"hsncode": null,
"gstslab": 0.001,
"isnotforsale": false
},
{
"_id": "5b6b383595c4160537731df4",
"fptag": "SALBROENGINEERS",
"merchantname": null,
"customwidgets": null,
"externalsourceid": null,
"name": "Roundness n Cylindricity Machine Retrofit",
"description": "TALYROND 252 –RETROFIT SPECIFICATIONS.. FOR SALE\n\nNote*-Machines displayed are Products/property of respective Manufactures.\nMachine Pictures used are to state compatibility of our Retrofit Packages only.\n\n\nA. MESUREMENT CAPACITY\n\n1. Maximum diameter : 350 mm (13.8 in) optionally(also see Para 9) \nextendable to 500 mm (19.7 in)2. Maximum Weight : 20 kg (44.1 lb)3. Maximum Height of assessable Surface : 300mm (11.8 in)4. Worktable Moment Loading : 120 kgmm (10.4 lbin)5. Maximum Eccentricity : 25mm (0.98in) along the load line\n\nB. WORKTABLE AND SPINDLE\n1. Worktable Diameter :190mm (7.5 in)2. Speed of Rotation : 6 rpm nominal, clockwise3. Range of Centering Nominal : ±1mm (±0.04in)4. Range of Leveling Nominal : ±4.1 mrad (±14 arc minutes)5. Height of neutral plane above Worktable : 20mm (0.79in)6. Roundness Limit of Error : Concentric Load 20kg (44.1 lb)(Departure from the least within 0.06 µm 0.0003µm/mmSquares circle at 6 rpm with height above worktable 0-50 u.p.r filter) (1.5 µin 0.3 µin/in)*7. Axial Error : 0.15µm (3.9 µin) maximum axial movement of worktable during one revolution.\n*These departures may be inwards and outwards\n\nC. VERTICAL STRAIGHTNESS UNIT\n1. Measurement Length : 300 mm (11.8in),2. Accuracy of stop Measurement : 0.5mm (0.02in)3. Speed of Traverse (for set-up) : (1) Joystick slow speed0-3mm/s (0-0.12 in/s) for approx 70% of joystick travel. (2) Computer controlled <3 mm/sec variable.4. Straightness limit of Error : In the measuring plane: (Minimum zone straightness at 1µm over 300 mm (40µin 1mm/sec (0.04 in/sec) with over 11.8in) 8.0mm (0.3in) cut off low pass filter5. Positional Control Uncertainty : ±100µm (±0.004in) for one single move.6. Internal Capacity : 150mm (5.9in) For Straightness Limiting conditions, Maximum length of continuous Minimum diameter clearance Internal surface that can be assessed 115mm (4.5in) depth in bores larger thanØ25mm (Ø1in)7. For Roundness assessment Internal bore penetration : 150mm (5.9in), 115mm depth in bore of Ø25mm\n***Internal penetration for other than ‘limiting condition’ depends on component geometry.\n\nD. RADIAL STRAIGHTNESS UNIT1. Traverse Length : 200mm (7.9in) This may be set for up to 50mm (1.97in) of travel past the spindle axis. Standard setting is 25mm past the spindle axis.2. Speed of Traverse : up to 2mm/sec3. Positional control uncertainty : ±50µm (±0.002in) for one single move.This is for both relative and absolute movements.\n\nE. GAUGE1. Standard Stylus Arm Length : 75mm (2.95”) effective length2. Range of Gauge movement with80mm Stylus Arm : 1.2mm (0.079in) Nominal F. ELECTRICAL SUPPLY\n\n\nMain Instrument Overall Weight : 279kg (615lbs)\nOverall Length : 760mm (29.9in)\nOverall Width : 760mm (29.9in)\nOverall Height : 1513mm (59.6in)2. \n",
"price": 1.0,
"discountamount": 0.0,
"currencycode": "INR",
"priority": 1000000,
"isfreeshipmentavailable": false,
"shipmentduration": 7,
"_keywords": [
"SeRound",
"Pictures",
"Software",
"respective",
"Electronics",
"suit machines",
"system upgrades",
"various customer",
"Retrofit Packages",
"retrofit solution",
"state compatibility",
"Cylindricity Instruments",
"developed customized solutions",
"Roundness n Cylindricity Measuring",
"Inhouse developed Retrofit package"
],
"isarchived": false,
"isavailable": true,
"applicationid": null,
"productindex": 0,
"imageuri": "https://productimages.withfloats.com/actual/5954ef4c3bbec90b3872f2ea.jpg",
"tileimageuri": "https://productimages.withfloats.com/actual/5954ef4c3bbec90b3872f2ea.jpg",
"images": null,
"totalqueries": 0,
"gpid": null,
"groupproductid": null,
"createdon": "2017-06-29T12:15:08.9Z",
"updatedon": "2024-07-04T09:35:50Z",
"buyonlinelink": null,
"producturl": "http://WWW.SALBROENGINEERS.COM//roundness-n-cylindricity-machine-retrofit/0",
"availableunits": -1.0,
"iscodavailable": false,
"isprepaidonlineavailable": false,
"maxcodorders": -1,
"maxprepaidonlineorders": 0,
"uniquepaymenturl": null,
"brandname": "Salbro Engineers",
"category": "Roundness Tester Retrofit",
"tags": [
"Roundness",
"Cylindricity",
"Flatness",
"Relative Eccentricity",
"Straightness",
"Parallelism",
"Axial Runout",
"Radial Runout",
"Surface Parallelism",
"harmonics",
"squareness",
"Concentricity",
"spherocity",
"Perpendicularity"
],
"variants": false,
"keyspecification": null,
"otherspecifications": null,
"pickupaddressreferenceid": "",
"paymenttype": "AssuredPurchase",
"producttype": "products",
"hsncode": null,
"gstslab": 0.001,
"isnotforsale": false
},
{
"_id": "6686792aa432c82118617675",
"fptag": "SALBROENGINEERS",
"merchantname": null,
"customwidgets": null,
"externalsourceid": null,
"name": "Roundness & Cylindricity Tester RMI-D560C",
"description": "Roundness Measuring Instrument RMI-D560C\n\nTechnical specifications:\n\nRotary Table\nBearing Type:- Gas bearing\nRotation accuracy:(0.025+6H/10000)μm\nRotating speed:- 4,6,8,10rpm\nAdjust table: diameter:- 180mm\nTable loading capacity:- 25kg\nRotation diameter:- 560mm\nMax measure diameter:- 280mm\n\nColumn (Z-axis )\n\nColumn transverse travel:- 320mm (electric)\nMax detection depth:- 100mm (min inner diameter) : 30mm)\nColumn straightness:- 0.3μm /100mm\n\nHorizontal arm (X-axis)\nHorizontal movement:- 165mm (electric)\nProtrusion amount:- 25mm\n\nDetector\nAcquisition device:- Circle grating\nCircumference of sampling:- 14400 points\nSensor type:- Inductive Sensor\nSensor range :- ±300μm\nSensor resolution:- 0.001μm\nX raster:- RENISHAW grating scale 0.5um\nZ raster:- RENISHAW grating scale 0.5um\n\n*The above machine specifications can be customized and upgraded according to demand\n\nTechnical features\n1) The machine reference table and Z-axis column material are made of natural granite, the structure is not deformed, and the performance is more stable and reliable.\n2) The rotating spindle adopts a frictionless air-floating spindle, the accuracy is kept longer, and the\nrotation speed is stable\n3) The use of X-direction and Z-direction high-precision grating sensors improves the degree of\nautomation and realizes the measurement function that the sensors can automatically contact.\n4) The key components adopt special stress-relief alloy materials and special stress-relief treatment process, and the durability and accuracy are kept longer.\n\nCylindricity Introduction\nCylindricity measuring instrument is benchmark against precision rotary center and linear motion\nguide,the quantitative evaluation of the cylindricity is made by measuring the radius variation of\nactual contour of several cylindricity surface in different angle position to rotary center by\ndisplacement sensor in the guide. It is used to measure the error of contour shape of cylindricity workpiece (Roundness, cylindricity, planeness, straightness),position error (concentricity, coaxiality, run-out and perpendicularity)\n\nMeasurement Capability:\nEvaluation item: Cylindricity module: Radial full jump, concentricity, taper, radius\nRoundness module: Concentricity, radial single jump, wall thickness difference\nStraightness module: Parallelism, verticality\nSingle section flatness module: Axial single jump, verticality and parallelism\nMulti-section flatness module: parallelism, Axial full jump, verticality\nCommutator module: Single contacts jump, Adjacent contacts jump, intermittent difference of contacts.\n\nReference standard for cylindricity evaluation: LSCY、 MZCY、 MICY、 MCCY、 OSCY\n\nSoftware functions\n1) The software supports Chinese, English, and supports XP, win7, win8, win10 systems\n2) The standard report has various evaluation methods, and the parameters in the test report can be\nadded and deleted as needed.\n3) With commutator module, it can evaluate single-chip true circle, adjacent segment difference and\ngroove segment difference, and the measurement result can be deleted automatically or manually.\n4) Software can assist the rotating spindle to adjust the center and level, improve efficiency and save\ntime\n5) Measurement results can choose ISO statistical report or ISO standard report\n6) Can perform spectrum analysis on contour graphics\n7) Flatness measurement depending on the model can support single-section measurement (D420)\nor 2 to 15 multi-section measurements (D560C)\n8) In multi-section measurement, you can call, delete, and add to each section separately, and you\ncan choose 2 sections at will defined as the reference of the workpiece, performing 2 combined operations not only avoids repeated measurements, but also improves the measurement efficiency.\n9) Cylindricity is calculated by multiple axes, and each axis is corrected by software to minimize the error between the axis systems (D560C)\n10) 3D graphics display, and the graphics can be rotated, beautiful and easy to read. And observe the\noverall contour of the workpiece through relative zoom.\n11) The software is programmable, automatic measurement, and the original measurement data is\nautomatically saved.\n\n\nDevice Configuration\n\nMain Machine\n\nBasic Workbench:- Natural granite\nHigh-precision air float spindle:- \nRotation accuracy\n(0.025+6H/10000)μm\nColumn system:- Natural granite\nHorizontal system:- Steel structure\nPrecision alignment and leveling table 1 Alignment: ±3mm Leveling: ±2°\n\nFor Complete catalog kindly request it from Us",
"price": 1.0,
"discountamount": 0.0,
"currencycode": "INR",
"priority": 1000000,
"isfreeshipmentavailable": false,
"shipmentduration": 0,
"_keywords": [
"X raster",
"2 sections",
"test report",
"Sensor type",
"Gas bearing",
"14400 points",
"3mm Leveling",
"axis systems",
"Sensor range",
"280mm Column",
"Adjust table",
"relative zoom",
"multiple axes",
"win10 systems",
"contour shape",
"25mm Detector",
"Column system",
"position error",
"actual contour",
"key components",
"Horizontal arm",
"Rotating speed",
"rotation speed",
"0.5um Z raster",
"Steel structure",
"overall contour",
"natural granite",
"Evaluation item",
"Axial full jump",
"Complete catalog",
"contour graphics",
"Inductive Sensor",
"rotating spindle",
"Radial full jump",
"Rotation accuracy",
"Horizontal system",
"spectrum analysis",
"Sensor resolution",
"Protrusion amount",
"Commutator module",
"table 1 Alignment",
"Axial single jump",
"Software functions",
"Technical features",
"measurement result",
"Reference standard",
"Acquisition device",
"min inner diameter",
"radial single jump",
"displacement sensor",
"Horizontal movement",
"Column straightness",
"Straightness module",
"Precision alignment",
"Cylindricity module",
"ISO standard report",
"linear motion guide",
"Max detection depth",
"measurement function",
"Flatness measurement",
"Max measure diameter",
"Single contacts jump",
"2 combined operations",
"automatic measurement",
"repeated measurements",
"measurement efficiency",
"cylindricity workpiece",
"Measurement Capability",
"machine specifications",
"Z-axis column material",
"25kg Rotation diameter",
"Adjacent contacts jump",
"ISO statistical report",
"quantitative evaluation",
"cylindricity evaluation",
"intermittent difference",
"radius Roundness module",
"10) 3D graphics display",
"precision rotary center",
"machine reference table",
"single-chip true circle",
"Technical specifications",
"Column transverse travel",
"different angle position",
"Cylindricity Introduction",
"original measurement data",
"groove segment difference",
"wall thickness difference",
"Rotary Table Bearing Type",
"single-section measurement",
"various evaluation methods",
"adjacent segment difference",
"several cylindricity surface",
"Circle grating Circumference",
"180mm Table loading capacity",
"Multi-section flatness module",
"Single section flatness module",
"High-precision air float spindle",
"frictionless air-floating spindle",
"Cylindricity measuring instrument",
"2 to 15 multi-section measurements",
"special stress-relief alloy materials",
"special stress-relief treatment process",
"Z-direction high-precision grating sensors",
"Device Configuration Main Machine Basic Workbench",
"Cylindricity Tester RMI-D560C Roundness Measuring Instrument RMI-D560C"
],
"isarchived": false,
"isavailable": true,
"applicationid": null,
"productindex": 53,
"imageuri": "https://bizimages.withfloats.com/actual/90a95825107047e5a4e16694249cf44a.jpg",
"tileimageuri": "https://bizimages.withfloats.com/actual/90a95825107047e5a4e16694249cf44a.jpg",
"images": null,
"totalqueries": 0,
"gpid": null,
"groupproductid": null,
"createdon": "2024-07-04T10:27:54.338Z",
"updatedon": "2024-07-04T10:27:54.338Z",
"buyonlinelink": null,
"producturl": "http://WWW.SALBROENGINEERS.COM/products/roundness-cylindricity-tester-rmi-d560c/53",
"availableunits": -1.0,
"iscodavailable": false,
"isprepaidonlineavailable": true,
"maxcodorders": 0,
"maxprepaidonlineorders": 0,
"uniquepaymenturl": null,
"brandname": "",
"category": "Roundness Tester",
"tags": null,
"variants": false,
"keyspecification": null,
"otherspecifications": null,
"pickupaddressreferenceid": "",
"paymenttype": "AssuredPurchase",
"producttype": "products",
"hsncode": "",
"gstslab": 0.001,
"isnotforsale": false
},
{
"_id": "6685572d4409440d98840461",
"fptag": "SALBROENGINEERS",
"merchantname": null,
"customwidgets": null,
"externalsourceid": null,
"name": "Camber assessment Program",
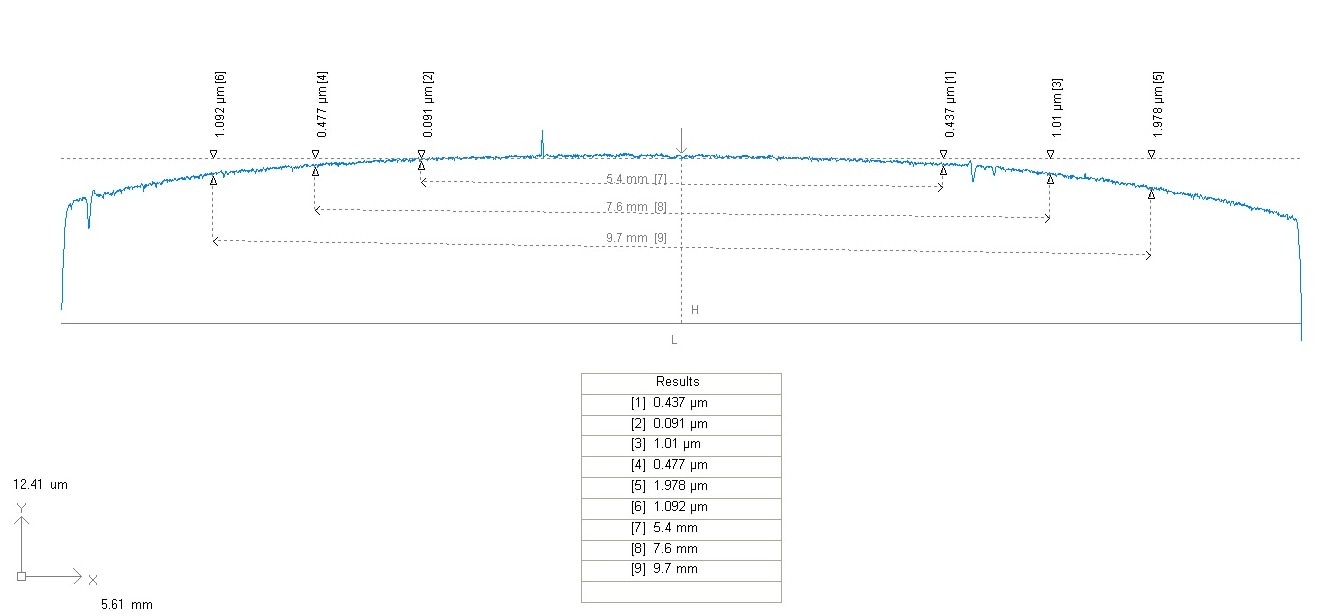
"description": "Assessment of Roller profile depth against specified axial length. This is an important parameter for Rollers & Rings in Bearings. This Parameter also gives contact area against load caring capacity. ",
"price": 1.0,
"discountamount": 0.0,
"currencycode": "INR",
"priority": 1000000,
"isfreeshipmentavailable": false,
"shipmentduration": 0,
"_keywords": [
"contact area",
"axial length",
"important parameter",
"load caring capacity",
"Roller profile depth",
"Camber assessment Program"
],
"isarchived": false,
"isavailable": true,
"applicationid": null,
"productindex": 54,
"imageuri": "https://productimages.withfloats.com/actual/5f7b1528db5c79000197f49e.jpg",
"tileimageuri": "https://productimages.withfloats.com/actual/5f7b1528db5c79000197f49e.jpg",
"images": null,
"totalqueries": 0,
"gpid": null,
"groupproductid": null,
"createdon": "2024-07-03T13:50:37.565Z",
"updatedon": "2024-07-03T13:51:54Z",
"buyonlinelink": null,
"producturl": "http://WWW.SALBROENGINEERS.COM/products/camber-assessment-program/54",
"availableunits": -1.0,
"iscodavailable": false,
"isprepaidonlineavailable": true,
"maxcodorders": 0,
"maxprepaidonlineorders": 0,
"uniquepaymenturl": null,
"brandname": "SeSurf Salbro Engineers",
"category": "Special Prgs Surface Metrology",
"tags": [
"Rollers",
"Rings",
"camber",
"Height",
"Surface Metrology"
],
"variants": false,
"keyspecification": null,
"otherspecifications": null,
"pickupaddressreferenceid": "",
"paymenttype": "AssuredPurchase",
"producttype": "products",
"hsncode": "",
"gstslab": 0.001,
"isnotforsale": false
}
],
"hasmoreitems": false,
"isapirequest": false,
"totalresults": 27,
"query": null,
"floatingpoint": null
}