Preview

This is your website preview.

Currently it only shows your basic business info. Start adding relevant business details such as description, images and products or services to gain your customers attention by using Boost 360 android app / iOS App / web portal.

SALBROENGINEERS 5954e9473576cd05187e322f Products https://www.salbroengineers.com

Manufacturing test

Roundness Measuring Instrument RMI-D560CTechnical specifications:Rotary TableBearing Type:- Gas bearingRotation accuracy:(0.025+6H/10000)μmRotating speed:- 4,6,8,10rpmAdjust table: diameter:- 180mmTable loading capacity:- 25kgRotation diameter:- 560mmMax measure diameter:- 280mmColumn (Z-axis )Column transverse travel:- 320mm (electric)Max detection depth:- 100mm (min inner diameter) : 30mm)Column straightness:- 0.3μm /100mmHorizontal arm (X-axis)Horizontal movement:- 165mm (electric)Protrusion amount:- 25mmDetectorAcquisition device:- Circle gratingCircumference of sampling:- 14400 pointsSensor type:- Inductive SensorSensor range :- ±300μmSensor resolution:- 0.001μmX raster:- RENISHAW grating scale 0.5umZ raster:- RENISHAW grating scale 0.5um*The above machine specifications can be customized and upgraded according to demandTechnical features1) The machine reference table and Z-axis column material are made of natural granite, the structure is not deformed, and the performance is more stable and reliable.2) The rotating spindle adopts a frictionless air-floating spindle, the accuracy is kept longer, and therotation speed is stable3) The use of X-direction and Z-direction high-precision grating sensors improves the degree ofautomation and realizes the measurement function that the sensors can automatically contact.4) The key components adopt special stress-relief alloy materials and special stress-relief treatment process, and the durability and accuracy are kept longer.Cylindricity IntroductionCylindricity measuring instrument is benchmark against precision rotary center and linear motionguide,the quantitative evaluation of the cylindricity is made by measuring the radius variation ofactual contour of several cylindricity surface in different angle position to rotary center bydisplacement sensor in the guide. It is used to measure the error of contour shape of cylindricity workpiece (Roundness, cylindricity, planeness, straightness),position error (concentricity, coaxiality, run-out and perpendicularity)Measurement Capability:Evaluation item: Cylindricity module: Radial full jump, concentricity, taper, radiusRoundness module: Concentricity, radial single jump, wall thickness differenceStraightness module: Parallelism, verticalitySingle section flatness module: Axial single jump, verticality and parallelismMulti-section flatness module: parallelism, Axial full jump, verticalityCommutator module: Single contacts jump, Adjacent contacts jump, intermittent difference of contacts.Reference standard for cylindricity evaluation: LSCY、 MZCY、 MICY、 MCCY、 OSCYSoftware functions1) The software supports Chinese, English, and supports XP, win7, win8, win10 systems2) The standard report has various evaluation methods, and the parameters in the test report can beadded and deleted as needed.3) With commutator module, it can evaluate single-chip true circle, adjacent segment difference andgroove segment difference, and the measurement result can be deleted automatically or manually.4) Software can assist the rotating spindle to adjust the center and level, improve efficiency and savetime5) Measurement results can choose ISO statistical report or ISO standard report6) Can perform spectrum analysis on contour graphics7) Flatness measurement depending on the model can support single-section measurement (D420)or 2 to 15 multi-section measurements (D560C)8) In multi-section measurement, you can call, delete, and add to each section separately, and youcan choose 2 sections at will defined as the reference of the workpiece, performing 2 combined operations not only avoids repeated measurements, but also improves the measurement efficiency.9) Cylindricity is calculated by multiple axes, and each axis is corrected by software to minimize the error between the axis systems (D560C)10) 3D graphics display, and the graphics can be rotated, beautiful and easy to read. And observe theoverall contour of the workpiece through relative zoom.11) The software is programmable, automatic measurement, and the original measurement data isautomatically saved.Device ConfigurationMain MachineBasic Workbench:- Natural graniteHigh-precision air float spindle:- Rotation accuracy(0.025+6H/10000)μmColumn system:- Natural graniteHorizontal system:- Steel structurePrecision alignment and leveling table 1 Alignment: ±3mm Leveling: ±2°For Complete catalog kindly request it from Us
Roundness & Cylindricity Tester RMI-D5

INR 1

VIEW DETAILS
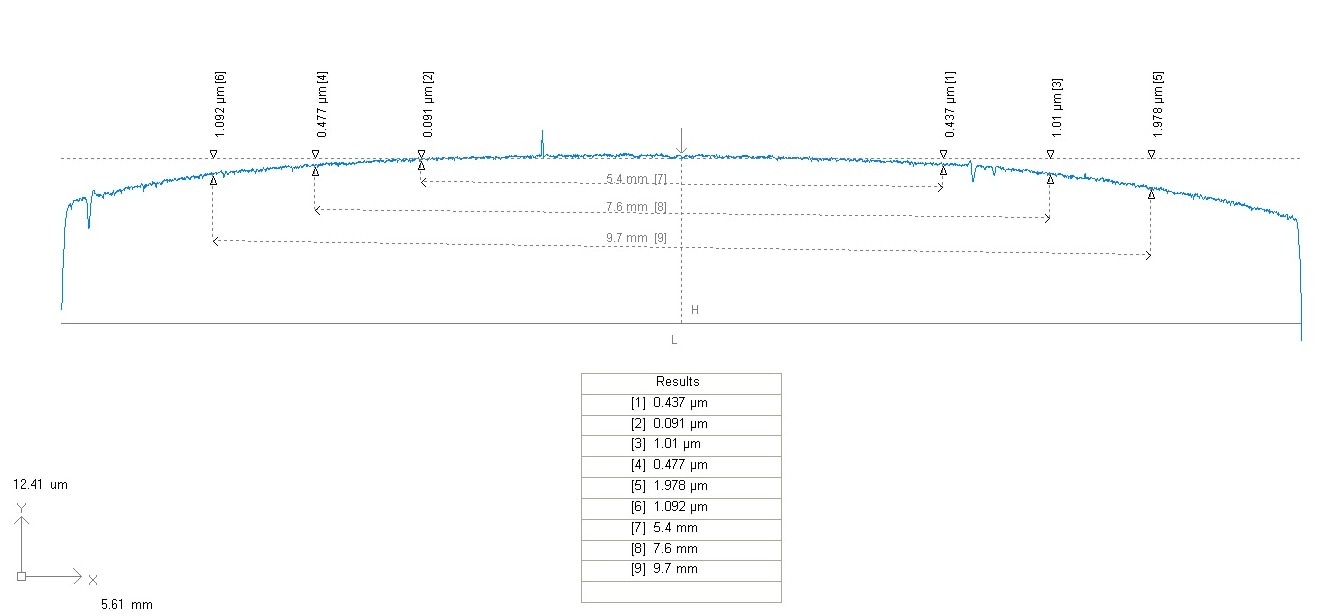
Assessment of Roller profile depth against specified axial length. This is an important parameter for Rollers & Rings in Bearings. This Parameter also gives contact area against load caring capacity.
Camber assessment Program

INR 1

VIEW DETAILS
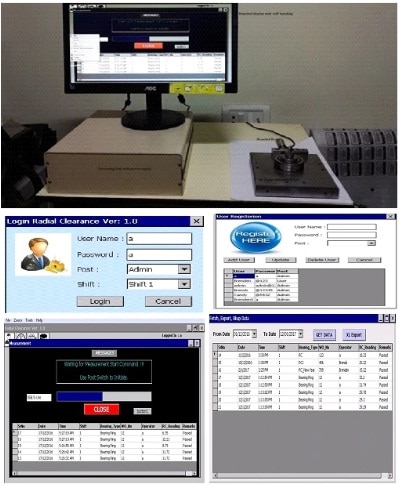
Analyze the internal geometrical clearance between the inner ring, outer ring and ball using this system developed jointly by Salbro Engineers and Base Technologies to cater to all bearing manufacturer companies.o The system is accurate and robust.o The GUI provided to the user is user friendly and the quickest way one would perform the radial clearance measurements.o The following fields are logged:- Sr No, DateTime, Shift, Bearing Type, W0_No, Operator Name, RC Reading, Remarks (Passed/Failed)o Login form: Is the first step for the Admin or the Operator/User to Log in.o User Registration: Only for Admin adding more Users/Operators. This form is only accessible to Admin Logins only.o Job Details: Operator to select correct Bearings Names/Types the rest of the fields in the form will auto populate themselves based on the Bearing Type/Name selected.o Message window in the measurement form guides the User to perform measurements at ease. The Data Grid below will auto Refresh itself after every measurement. The last measurement features at the top of the list. This data grid list will display data only for that particular day.o Date wise data retrieval (Date from xxxx To xxxx) fields. This form will not be accessible to the User/Operator at RC Gauge station but only for Admin.o Excel Export : Export data to Excel (.xls) after populating the data grid. The files can be opened in any PC having MS Office Excel installed.o Administrators will have the advantage of remotely connecting to the system via LAN if required.
Bearing Radial Clearance and Data Logg

INR 1

VIEW DETAILS
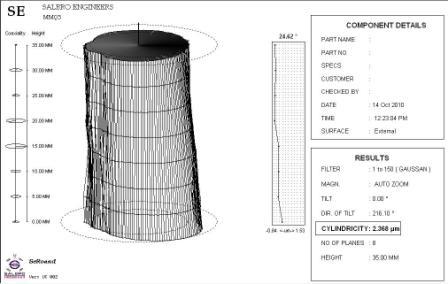
SeRound the Software Retrofit is user friendly, powerful and is performance driven. It is developed in-House at Salbro Engineers and has under gone years of field tests. It provides a through interactive user interface between the user and the Instrument. All Integrated to make one precise instrument to detect and assess the following results in Roundness, Concentricity, Eccentricity, Flatness (rotating 3D profile display), Cylindricity, Straightness, Parallelism, Squareness, Coaxiality and Radial Run-out, Axial Run-Out, Harmonics.SeRound is proficient in Data acquisition, profile filtering, and assessment of the roundness parameters and graphical presentation of the results. It also performs instrument control. SeRound’s Setup and Measure window assists the user in accurately centering and leveling the job thus saving on time and improving productivity. The measuring process is initiated by the user by a mere click of a button and displaces measure completed’ massage at the end of measuring sequence. SeRound offers options to choose the method of calculation and assessment. Roundness and Flatness assessments are carried out on 4 internationally recognized reference circles (LSC, MIC, MCC and MZC). Option to the User is able to omit unwanted data and carry out analysis with remaining data. Measured data can be saved, retrieved and re-analyzed to any of the available conditions as desired by the user.
Seround Roundness & Cylindricity Machi

INR 1

VIEW DETAILS
The automated Soccer Trainer machine is a product entirely developed In-house comprising of mechanical structure, Electronics, Embedded and the User Interface software system all put together to achieve a dynamic football training machine.Product Featureso Auto Calirate @ the click of a buttono Tilt/Vertical movement : The angle (degs) range for Tilt movement is from -10 degs to 90 degs.o Pan / Horizontal movement : The angle (degs) range for Pan Movement is from -45 degs to 45 degs.o Ball Shooters / Rollers : The right and left roller motors run at 540 rpm to 4200 rpmo Robust Designo Well selected, motors and encoders (high PPR).o Swing,Spin the ball based on appropriate settings]o Encoder with hogh PPR for position feedback.o Heavy motors for Ball shoot rollers.Embedded n Electronic featureso Well designed electronic boardso Boards are CNC manufactured.o High end micro controller to control the machine.PC User Interface Software (Win Desktop).o Interface between micro conroller n PC software is via Serial porto Lan port interfacing can also be incorporated (optional)o Three levels of trainng settings ( Baic,Advanced,Intermediate)o Create libraries of settings for Pan,Tilt,Right n Left Roller speedso Once the settings are saved, Input the no of balls you need to feed for training,     the system handles it all unmanned.Feature is Auto Ball Feed Modeo Manual movements of all motors.o Stop all motors or individual motors.Video's : https://www.youtube.com/watch?v=1k_rQgFsp7I              https://www.youtube.com/watch?v=I3dVJiWE_RQ
Soccer Trainer Machine

INR 1

VIEW DETAILS
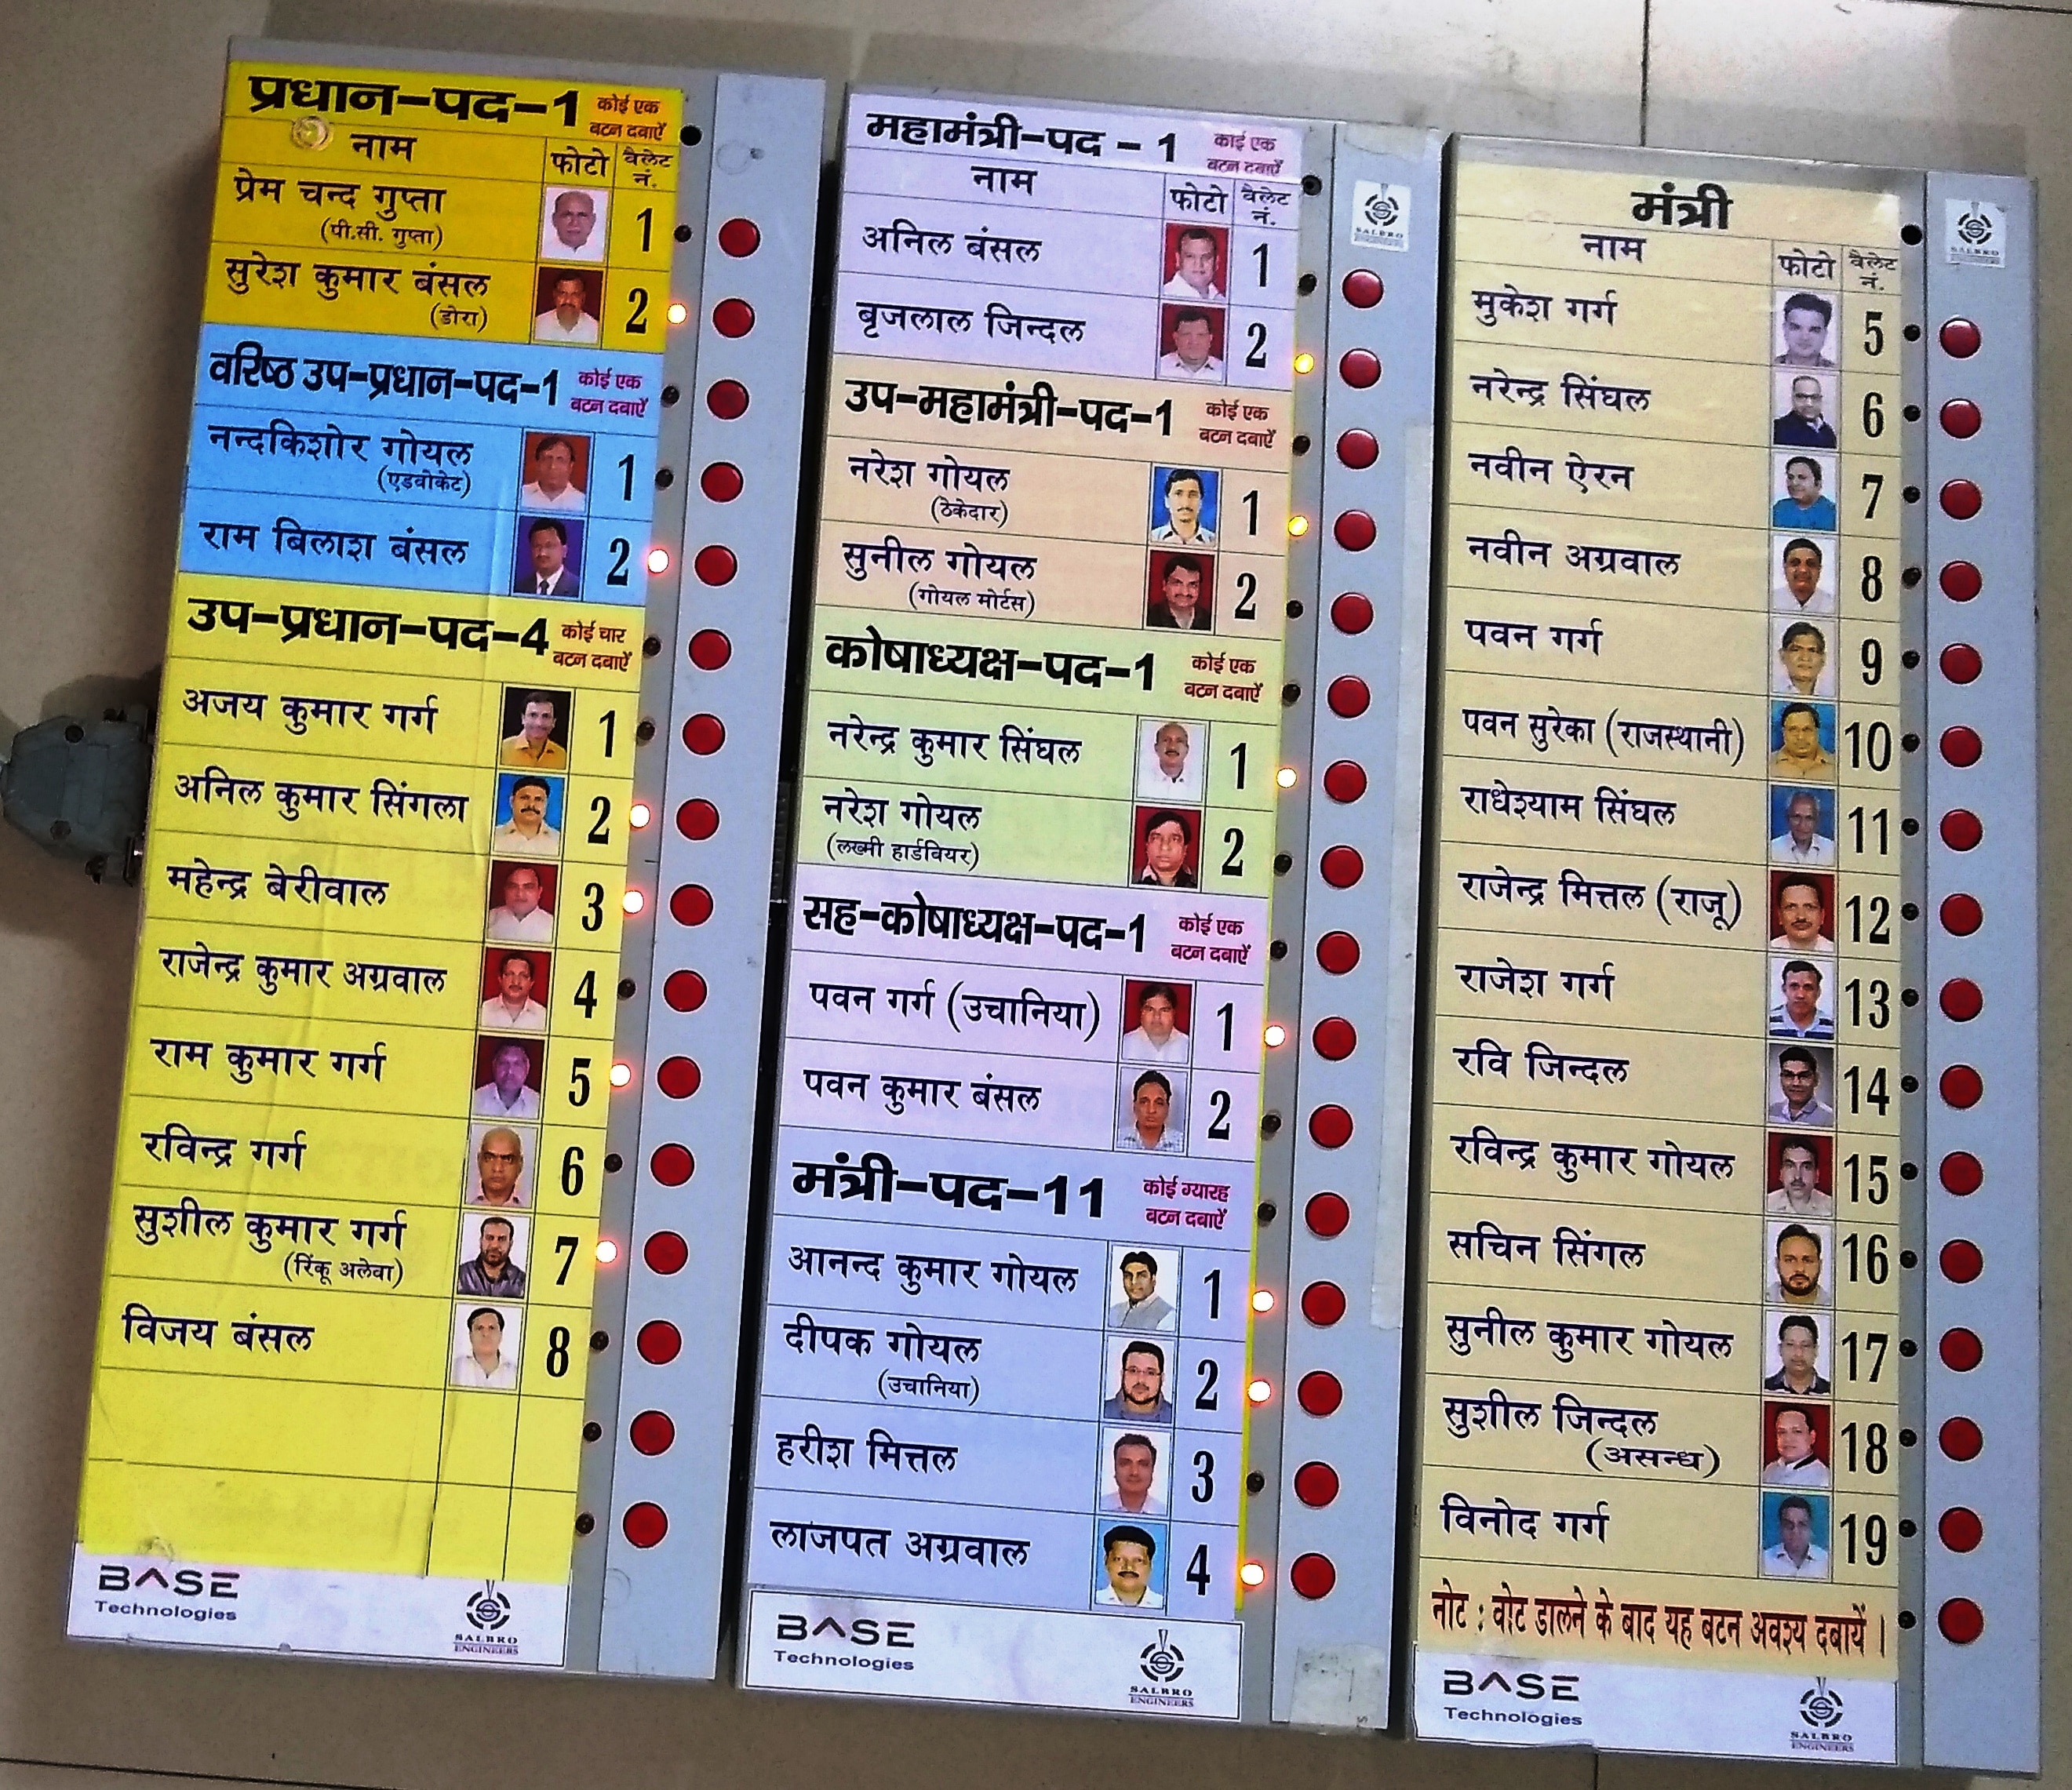
The Electronic Voting Machine (EVM) is a voting system completely developed In-House jointly by Salbro Engineers and Base Technologies. Both these companies jointly handle projects and operate from the same premises in Mumbai, India. Our EVM’s are Government Test Lab certified and are one of the most sort-out piece of equipment available in the market today. Reading through this catalogue will help you know about the features this product has to offer.Our system is accurate, robust, user friendly and “Is performance” driven in its operations.EVM Features1) Controller based system of Voting in comparison to Previous Ballot Paper Voting.2) Tamper Proof. No influence of radioactive waves, electromagnetic waves etc3) Electro – Mechanical buttons are used in the ballot units4) Registering of votes is instant. Saves time and cost.Field configurable: Configure the EVM via Evm_App software to set1) No of Candidates contesting elections2) No of Categories (upto 15 Categories) OR no category3) No of votes the voter is permitted to cast.4) The system does not allow the voter to vote twice for a candidate.5) Compulsory/Not compulsory voting.    o Should the voter cast all permissible votes or Not?    o No of winners to be selected from each categoryPc/Laptop is connected to EVM control units only to configure them before voting starts and for retrieving of vote data after election ends else the EVM system works independently.A total of 65,000 voters can cast votes in one EVM.65,000 votes for each candidate can be cast.Basic model of our EVM accepts up to 16 contestants /candidates in the race. Exceeding 16 candidates we cascade/ attach additional Ballot unit of 16 buttons each.One EVM control unit can handle up to 64 candidates.No loss of voting data even in the case of power failure.No invalid votes can be castVoting data is stored in memory chips and the data is stored for decades.Memory chips can only be erased by authenticated users only via the PC/Laptop“Evm_App” software.Transfer data from Evm Control Units to Evm_App for consolidated reports, excel exports.Encoded / Encrypted files can be uploaded unto server in a secure manner.Reusability.Conduct voting even in the absence of electrical supply.Eco Friendly.PC Software – EVM Data AnalysisThe PC software is a windows based desktop application and it provides the user with a graphical user interface inRequesting stored data from all controls units.Configuring the EVM in setting theNo of Candidates contesting elections.No of Categories  (11 Categories in all) OR no categoryNo of votes the voter is permitted to cast.Compulsory/Not compulsory votingNo of winners to be selected from each categorySetting the communication Port for hand shaking between software and control unit.Receiving data from control units, decoding it and saving data into respective encrypted files.It does not consider data from the same unit even if multiple requests are made.It outputs a consolidated report considering data from all units that were connected to PC.Applicationso Co-Op Hsg Societies for Managing Committee.o Co-Op Banks .o Associations n Trusts (Board n Trustee selections)o Corporate Companies (Board, Secretary n Chairman selections)o Panchayat & Municipal elections.o Schools, Colleges & Universities.o General n Assembly elections & any other election.ServicesWe also provide services like conducting and supervising elections until Election Result is declared.
Voting Machines

INR 1

VIEW DETAILS
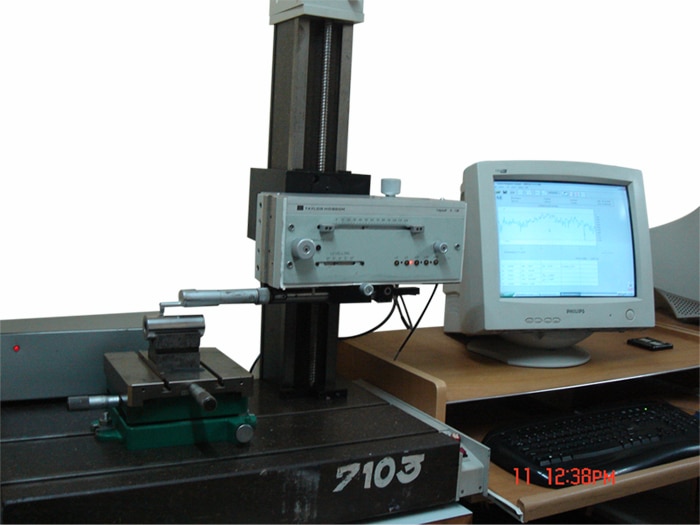
Note*-Machines displayed are Products/property of respective Manufactures.Machine Pictures used are to state compatibility of our Retrofit Packages only.Retrofit your existing Roundness and Cylindricity Instruments with SeRound an Inhouse developed Retrofit package comprising of Electronics and Software to suit machines for various manufactures. •	SeRound the Software Retrofit for Talyrond252 is accurate, user friendly, robust and is performance driven. It is developed in-House at Salbro Engineers and provides a through interactive user interface between the user and the Instrument with the help of the Electronic Interface unit also developed in-House at Salbro EngineersAll Integrated to make one precise instrument to analyze / detect the following •	Parameters: Roundness,Concentricity,Relative Ecentricity,  Flatness. Squareness, Coaxiality, Cylindricity, Axial Runout, Radial Runout, Face Parallelism,Straightness,ParallelismData acquisition, profile filtering, evaluation of the roundness and other parameters and graphical output of the results as well as for the instrument control (like Starting and Stopping the motor and selection of the amplifier range) Arm and Column movement (Incremental / Absolute), Gauge Position and orientation has been realized by SeRound. The cycle of measure guides the operator in the operations of table centering and leveling and subsequently in the acquisition of the profile. Besides the default cycles of measure it is also possible to make calculations on the previously acquired profiles; moreover it is possible to plan the cycle of acquisitions. This is very useful especially when you have to measure many similar work pieces, with the same parameters and you need to enhance the measuring speed.SeRound allows you to choose the method of calculation to perform the measurement and to elaborate the results. SeRound’s Setup and Measure window provides a tool to the user to center the jobs quite accurately and quickly thus saving on time and improving productivity. Talyrond 252 with SeRound Analysis software Retrofit comes with 12 months warranty period
PC Retrofit Roundness n Cylindricity M

INR 1

VIEW DETAILS
The Electronic Voting Machine (EVM) is a voting system completely developed In-House jointly by Salbro Engineers and Base Technologies. Both these companies jointly handle projects and operate from the same premises in Mumbai, India. Our EVM’s are Government Test Lab certified and are one of the most sort-out piece of equipment available in the market today. Reading through this catalogue will help you know about the features this product has to offer.Our system is accurate, robust, user friendly and “Is performance” driven in its operations.EVM Features1) Controller based system of Voting in comparison to Previous Ballot Paper Voting.2) Tamper Proof. No influence of radioactive waves, electromagnetic waves etc3) Electro – Mechanical buttons are used in the ballot units4) Registering of votes is instant. Saves time and cost.Field configurable: Configure the EVM via Evm_App software to set1) No of Candidates contesting elections2) No of Categories (upto 15 Categories) OR no category3) No of votes the voter is permitted to cast.4) The system does not allow the voter to vote twice for a candidate.5) Compulsory/Not compulsory voting.    o Should the voter cast all permissible votes or Not?    o No of winners to be selected from each categoryPc/Laptop is connected to EVM control units only to configure them before voting starts and for retrieving of vote data after election ends else the EVM system works independently.A total of 65,000 voters can cast votes in one EVM.65,000 votes for each candidate can be cast.Basic model of our EVM accepts up to 16 contestants /candidates in the race. Exceeding 16 candidates we cascade/ attach additional Ballot unit of 16 buttons each.One EVM control unit can handle up to 64 candidates.No loss of voting data even in the case of power failure.No invalid votes can be castVoting data is stored in memory chips and the data is stored for decades.Memory chips can only be erased by authenticated users only via the PC/Laptop“Evm_App” software.Transfer data from Evm Control Units to Evm_App for consolidated reports, excel exports.Encoded / Encrypted files can be uploaded unto server in a secure manner.Reusability.Conduct voting even in the absence of electrical supply.Eco Friendly.PC Software – EVM Data AnalysisThe PC software is a windows based desktop application and it provides the user with a graphical user interface inRequesting stored data from all controls units.Configuring the EVM in setting theNo of Candidates contesting elections.No of Categories  (11 Categories in all) OR no categoryNo of votes the voter is permitted to cast.Compulsory/Not compulsory votingNo of winners to be selected from each categorySetting the communication Port for hand shaking between software and control unit.Receiving data from control units, decoding it and saving data into respective encrypted files.It does not consider data from the same unit even if multiple requests are made.It outputs a consolidated report considering data from all units that were connected to PC.Applicationso Co-Op Hsg Societies for Managing Committee.o Co-Op Banks .o Associations n Trusts (Board n Trustee selections)o Corporate Companies (Board, Secretary n Chairman selections)o Panchayat & Municipal elections.o Schools, Colleges & Universities.o General n Assembly elections & any other election.ServicesWe also provide services like conducting and supervising elections until Election Result is declared.
Electronic Voting Machine

INR 1

VIEW DETAILS
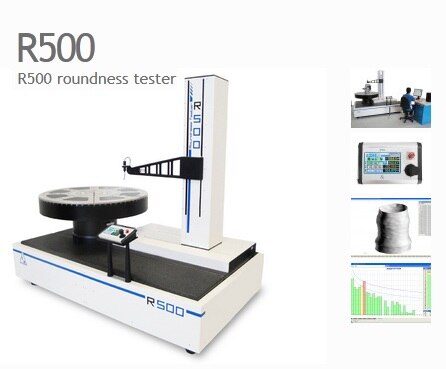
R500 roundness tester is located at the top of machines for the characterization of revolution surfaces in the world panorama for what concerns the maximum dimensions of the object that can be measured; born from the thirty year experience that SM has in this field, it has been designed to measure bulky and heavy pieces, maintaining high accuracies.R500 features 3 metrological axes, pneumostatically supported, for measurement and positioning, which ensure fluent movements without frictions and remarkable sturdiness of the entire system.The flagship application of R500 is the characterization of bulky particulars in the energy sector (turbines, compressors, bearings) where all the essential characteristics for the final quality of the product must be determined.The motorized plate allows the automatic centering of the piece, executed with a procedure inside the Circom software.CHARACTERISTICS:Pneumostatic platePlatform diameter: 650 mmExpansion diameter:  1200 mmMaximum measureable diameter:   1300 mmAxial bearing capacity:    1500 kgRadial run-out (at plate level):  ≤0,1 μmSpeed: 0,25 – 3 rpm (measurement) 0 – 6 rpm (positioning)Friction: Pneumostatic due to manual rotationCentring range: ±5 mm with automatic cycleLevelling range: ± 1°Resolution: 0,009° (40k pts/rev)Pneumostatic R axisUseful traverse length: 650 mmLinearity:  ≤ 0,5 μm su 500 mmSpeed:   0,2 – 10 mm/sResolution: 1 μmC axis (Column with recirculating ball guides)Useful traverse length: 900 mmMaximum height  : 600 mm (from plate surface)Linearity error:   ≤ 0,5 μm on 500 mmSpeed  : 0,5 – 15 mm/sResolution 0,1 μmPick-up Measurement positioning: In three positions (internal, external, lateral)Measurement strength  :  Internal/external 20 – 150 mNMeasurement range :   ±1000 μmSupplied pick-ups  :   N° 3 two-directional with 8 mm ruby sphere
R500 Roundness Tester

INR 1

VIEW DETAILS
RT90G roughness tester is unique in its category because it features a built-in calculation unit and measurement procedure, thus being the first ''All-in-one’’ roughness tester. Extremely compact and easy to handle, it conveniently allows positioning also on large size pieces, thanks to built-in micrometrics with 100 mm range. The shiny 3.7’’ colour touchscreen display combined to the icon interface, allows the operator to set the measurement parameters, moving on the piece and carrying out the analysis quickly. The results obtained and the relative tolerances are immediately displayed and can be downloaded on PC or printer using the external printer. The internal reference allows to perform analyses also on W waviness parameters, while the bistable pick-up holder allows measuring with one simple gesture, with or without skid, as required.CHARACTERISTICS:Measurement range:	±500μmResolution	0,001 μmCut-off lenght	0,25 – 0,8 - 2,5 mmCut-off number	Selectable from 1 to 19Traverse lenght:            	Up to 50 mmPick-up:	Inductive, it can be rotated of 90° for lateral measurementsMeasurement parameters    	54 parameters(Ra, Rq, Rt, Rz, Rp, Rc, Rv, Rsk, Rku, Rsm, Rdc, RPc, Pa, Pq, Pt, Pp, Pc, Pv, Psm, Pdc, PPc, Wa, Wq, Wt, Wz, Wp, Wv, Wc, WSm, Wdc, WPc, Rk, Rpk, Pvk, Mr1, Mr2, Pt, Pdc, PPc, R, Rx, AR, Wte, W, AW, Wx, Rke, Rpke, Rvke, Mr1e, Mr2e Rmax, R3z, R3zm)Graphs displayed:	Roughness, waviness, primary, total, bearing capacity curve, and distribution of ordinates.Unit of measurement:  	Millimeters and inchesInterface:TFT, 3.7'' colour graphic Touchscreen display and 3 waterproof membrane buttonsLanguages: 	Italian, French, English, German, Spanish and     PortugueseMemory: 	Up to 1000 measurementsAccessories:	RT90G roughness tester with SB10/60 pick-up, 110-230V battery charger, roughness sample, Case, User manual.
RT90G Portable Surface Roughness

INR 1

VIEW DETAILS
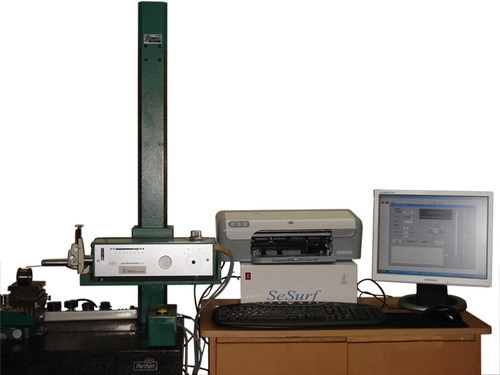
Note*-Machines displayed are Products/property of respective Manufactures.Machine Pictures used are to state compatibility of our Retrofit Packages only.Pre Owned Talysurf 5 – Retrofitted with SeSurf Ready for Immediate Dispatch•	Five Traverse Speeds 0.05mm to 2.5mm per sec•	120mm mechanical Datum Traverse for Skid & No Skid•	Motorised Column Stand•	Stylus Range: 1000 um•	Three Filter Modes: Gaussian, 2CR & 2CR PC•	Five Filter Cut Offs: 0.08, 0.25, 0.8, 2.5 & 8mm•	Analysis of Profile, Unfiltered, Roughness & Waviness•	Resolution: 0,01 / 0.001 & 0.0001μm •	Section Remove to delete un wanted data •	Hard Coded User Logo, Name, Location etc•	Five fields for entering Job details•	Specials: Auto Save, Excel Export with Statistical. Parameters & More  Talysurf5 with SeSurf computer Interface/ Retrofit is a laboratory standard with ruggedness and easy to use. The Software is User friendly but powerful. The Talysurf5 instrument maintains a high level of measurement accuracy and performance reliability, but is available at minimum capital investment. The Granite Base Tee slots are pre aligned to the Pick Up Stylus tip for easy alignment of the job under test. The Manual Column allows to measure up to 350mm above the Base surface. SeSurf allows the user to make measurements, analyze them and even re- analyze them to any other conditions and parameters at any later date in the future, thus decreasing Time and improving Productivity. Effective surface characterization requires accurate acquisition of data, coupled with appropriate analysis. Traditional measurement methods have reported only surface roughness, providing an incomplete picture of the surface texture, which comprises a matrix of complex, interrelated characteristics. SeSurf incorporates the best industry Standards for data analysis. Unfiltered profiles can be analyzed for Roughness, Waviness with cutoff wave lengths of 0.08 mm, 0.25 mm, 0.8 mm, 2.5 mm, 8 mm in 3 digital filters wiz: Gaussian, 2CR and 2CR PC (Phase Corrected). SeSurf also provides an option for data to be analyzed with a combination of both Roughness and Waviness.SeSurf provides 22 different Unfiltered Profile parameters, 26 Roughness and Waviness parameters.SeSurf’s Bearing Ratio curve enables the user to asses’ contact/area at a given depth from profile height in percentage to the assessment length. Parameters assessed are Tp1, Tp2, Htp, Rmr, Rk, Rpk, Rvk, HSC and Pc.Talysurf5 with SeSurf Retrofit Package comes with a 12 month warranty period.
Talysurf5_SeSurf Retrofit Package

INR 1

VIEW DETAILS
Note*-Machines displayed are Products/property of respective Manufactures.Machine Pictures used are to state compatibility of our Retrofit Packages only.Description :• SeSurf User Interface to Control, Measure and Position• Raw Profile ( Best Fit Line, Curve, Slope Remove)• Unfiltered profile Analysis (24 parameters)• Roughness profile Analysis (24 parameters)• Waviness profile Analysis (24 parameters)• Three Filter Modes: Gaussian, 2CR & 2CR PC• Bearing Ratio Curve Parameters• Crowning (Camber Measurements)• Multi Data Plot• Specials programs for Analysis can also be developedSeSurf computer Interface/ Retrofit is a laboratory standard with ruggedness and easy to use.The Software is User friendly and Powerful.SeSurf allows the user to make measurements, analyze them and even re- analyze them to any other conditions and parameters at any later date in the future, thusdecreasing Time and improving ProductivityEffective surface characterization requires accurate acquisition of data, coupled with appropriate analysis.Traditional measurement methods have reported only surface roughness, providing an incomplete picture of the surface texture, which comprises a matrix of complex, interrelated characteristics.SeSurf incorporates the best industry Standards for data analysis.Data acquired from the instrument is represented graphically in Raw, Unfiltered, Roughness and Waviness modes.Raw data acquired can be analyzed for Slope Removal, Best Fit Line and Best Fit Arc which ever suits the form of the job.There is also a provision for the user to omit areas, unwanted for further analysis.Unfiltered profiles can be analyzed for Roughness, Waviness with cutoff wave lengths of 0.08 mm, 0.25 mm, 0.8 mm, 2.5 mm, 8 mm in 3 digital filters wiz: Guassian, 2CR and 2CR PC (Phase Corrected). SeSurf also provides an option for data to be analyzed with a combination of both Roughness and Waviness.SeSurf provides 14 parameters for Unfiltered Profiles and 24 for Roughness and Waviness parameters. It also enables the user to perform Statistical analysis on measured results.SeSurf’s Bearing Ratio curve enables the user to asses contact/area at a given depth from profile height in percentage to the assessment length.Parameters assessed are Tp1, Tp2, Htp, Rmr, Rk, Rpk, Rvk, HSC and Pc.SeSurf Machine Retrofit comes with 12 months free warranty.
PC Retrofit Roughness & Waviness

INR 1

VIEW DETAILS

Filter using tags

Measure ComponentsMeasure Balls for RoughnessMeasure Components for RoughnessMeasurement ServiceRaRzRoughness ParameteresRoughness MeasurementWaviness AnalysisWaviness MeasurementRoller Camber MeasurementRoller Camber Analysis programRoller Camber AssesmentelectionVoting MachineDigital VotingCandidateselectronic votingElectronic Voting MachineEVMVoteElection voting MachineCo-Op Bank ElectionRoughnesssSurface RoughnessPalmtop RoughnessSurface MetrologyRoughness Testersurface analysisPortable Roughness TesterWARPsurfroughness parametersRoughnessWavinessDominant wavinessMaterial ratio curve (bearing)height amplitude distributionroughness averageroundnessConcentricityParallelismCylindricityDiameterPerpendicularityThickness variationNew Roundness and Cylindricityroundness testerRoundness Measuringroundness measurementCylindricity measurementStraightnessbearing ratio curveraunfiltered profileGaussian Filter2CR filterDigital filtersMachine controlPre-owned MachinesRetrofit PakageSurface Roughness & Waviness Retrofitsurface roughness retrofitAnalysis softwareAnalysisRoughness AverageRetrofitBearingRadial PlayRadialEmbeddedADCPlunger ProbeBearing Radial ClearanceData Logger SystemEmbedded systemEmbedded codingLan Remote ConnectRollersRingsBearingsCamberMeasurement ServicesCalibrationContour MeasurementContour Machine CalibrationCalibrateCAD programCAD functionsRoundness Teste Retrofit PackageLaboratary Roundness TesterUpgraded SoftwareFlatnessRelative EccentricityeccentricitysquarenessVelocity AnalysisHarmonicsAxial RunoutRadial RunoutRtBallsPortableContourTalysurf5120mm TraverseRetrofitted machinesSeSurf Retrofit PackageOn SaleSurface FinishRoughness Meanlarge Size Bearings measurementForm Measurementturbines measurementcompressors measurementRoundnessCylindricity with RoundnesscoaxialityspherocitySKF Waviness Analysistotal run outrun-outPortable RoughnessTalysurf4Transperant, Reliable, RobustLinear GraphFFT algorithumLSCMICMCCMZCSpecimen hemisphereGuizzo specimenSpecimen cylindercalibrate sensitivityGlass HemisphereMaster CylinderSoccerTrainerGoal Keeper TrainerFootball Trainer machinefootballTrainlinearitycylindricityconicityconcentricityparallelismthickness variationLabortary Roundness TestercontourProfile Studio softwareElectionVVPATEVM RentalsEVM for HireEVM on RentSoccer Trainerunmanned systemfootball practiSurface Parallelismharmonicsdata accusitionBest Fit CurveBest Fit LineSlope RemovalProfilometersAutomatic CNC positioningAutomatic CNC measuringPortable Surface Roughness TesterTransparent ResultsElectronic Votingvotemultiple votingnon tamperableEVM manufacturerElection voting SystemVoting SystemsFlatnesssParkingParking SolutionsParking managementUnmanned Parkingparking lotParking assistanceVotingVoting CenterVoting BoothMultiple VotingTalyrond 252SeRoundISO standardsISO 13565-1Radial ClearanceBrearing PlayDataloggerLog DataMultiple Category Votinglarge Size Bearingslarge size bearingsCylindricity With RoundnessMulti Profile PlotWave Amplitude ControlcamberHeight
Measure Components |Measure Balls for Roughness |Measure Components for Roughness |Measurement Service |Ra |Rz |Roughness Parameteres |Roughness Measurement |Waviness Analysis |Waviness Measurement |Roller Camber Measurement |Roller Camber Analysis program |Roller Camber Assesment |election |Voting Machine |Digital Voting |Candidates |electronic voting |Electronic Voting Machine |EVM |Vote |Election voting Machine |Co-Op Bank Election |Roughnesss |Surface Roughness |Palmtop Roughness |Surface Metrology |Roughness Tester |surface analysis |Portable Roughness Tester |WARPsurf |roughness parameters |Roughness |Waviness |Dominant waviness |Material ratio curve (bearing) |height amplitude distribution |roughness average |roundness |Concentricity |Parallelism |Cylindricity |Diameter |Perpendicularity |Thickness variation |New Roundness and Cylindricity |roundness tester |Roundness Measuring |roundness measurement |Cylindricity measurement |Straightness |bearing ratio curve |ra |unfiltered profile |Gaussian Filter |2CR filter |Digital filters |Machine control |Pre-owned Machines |Retrofit Pakage |Surface Roughness & Waviness Retrofit |surface roughness retrofit |Analysis software |Analysis |Roughness Average |Retrofit |Bearing |Radial Play |Radial |Embedded |ADC |Plunger Probe |Bearing Radial Clearance |Data Logger System |Embedded system |Embedded coding |Lan Remote Connect |Rollers |Rings |Bearings |Camber |Measurement Services |Calibration |Contour Measurement |Contour Machine Calibration |Calibrate |CAD program |CAD functions |Roundness Teste Retrofit Package |Laboratary Roundness Tester |Upgraded Software |Flatness |Relative Eccentricity |eccentricity |squareness |Velocity Analysis |Harmonics |Axial Runout |Radial Runout |Rt |Balls |Portable |Contour |Talysurf5 |120mm Traverse |Retrofitted machines |SeSurf Retrofit Package |On Sale |Surface Finish |Roughness Mean |large Size Bearings measurement |Form Measurement |turbines measurement |compressors measurement |Roundness |Cylindricity with Roundness |coaxiality |spherocity |SKF Waviness Analysis |total run out |run-out |Portable Roughness |Talysurf4 |Transperant, Reliable, Robust |Linear Graph |FFT algorithum |LSC |MIC |MCC |MZC |Specimen hemisphere |Guizzo specimen |Specimen cylinder |calibrate sensitivity |Glass Hemisphere |Master Cylinder |Soccer |Trainer |Goal Keeper Trainer |Football Trainer machine |football |Train |linearity |cylindricity |conicity |concentricity |parallelism |thickness variation |Labortary Roundness Tester |contour |Profile Studio software |Election |VVPAT |EVM Rentals |EVM for Hire |EVM on Rent |Soccer Trainer |unmanned system |football practi |Surface Parallelism |harmonics |data accusition |Best Fit Curve |Best Fit Line |Slope Removal |Profilometers |Automatic CNC positioning |Automatic CNC measuring |Portable Surface Roughness Tester |Transparent Results |Electronic Voting |vote |multiple voting |non tamperable |EVM manufacturer |Election voting System |Voting Systems |Flatnesss |Parking |Parking Solutions |Parking management |Unmanned Parking |parking lot |Parking assistance |Voting |Voting Center |Voting Booth |Multiple Voting |Talyrond 252 |SeRound |ISO standards |ISO 13565-1 |Radial Clearance |Brearing Play |Datalogger |Log Data |Multiple Category Voting |large Size Bearings |large size bearings |Cylindricity With Roundness |Multi Profile Plot |Wave Amplitude Control |camber |Height

Have any question or need any business consultation?

Have any question or need any business consultation?

Contact Us